Crafting a Java Program to Reverse Strings: Unleashing Your Inner Coding Wizard?

Hey there again, friends! In today’s post, we’ll dive into the world of Java programming and create a simple program to reverse a string without using any built-in Java API. This exercise is a fantastic way to strengthen your Java skills and get a better understanding of how strings work behind the scenes. So grab your coding hat, and let’s get started on this magical journey!

Understanding Strings in Java: Before we begin, let’s clarify what a string is in Java. A string is an object that represents a sequence of characters. Java strings are immutable, meaning their contents cannot be changed after they are created. When we manipulate strings, we create new string objects, leaving the original strings unaltered. With this in mind, let’s build a Java program that reverses a string without using any built-in APIs.

The Java Program: Reversing a String without APIs

public class StringReverserExample {

    public static void main(String[] args) {
        String input = "Hello, world!";
        String reversed = reverseString(input);
        System.out.println("Original String: " + input);
        System.out.println("Reversed String: " + reversed);
    }

    private static String reverseString(String input) {
        // Create a character array with the length of the input string
        char[] inputChars = new char[input.length()];

        // Iterate through the input string and store characters in reverse order
        for (int i = 0, j = input.length() - 1; i < input.length(); i++, j--) {
            inputChars[j] = input.charAt(i);
        }

        // Create a new string from the reversed character array
        return new String(inputChars);
    }
}

How the Program Works

  1. We define a reverseString method that accepts a string as input.
  2. We create a character array inputChars with the same length as the input string.
  3. We use a for loop to iterate through the input string and store its characters in reverse order in the inputChars array.
  4. We create a new string from the reversed character array and return it.

When we run the program with the input “Hello, world!”, we get the following output:

Original String: Hello, world!
Reversed String: !dlrow ,olleH

Summary

In this post, we explored a simple Java program to reverse a string without using any built-in Java APIs. This exercise helps us sharpen our Java skills and gain a deeper understanding of string manipulation. With a little creativity and determination, we can tackle even more exciting Java challenges and continue to push the boundaries of our programming expertise.

So let’s keep exploring related topics like data structures, algorithms, and other Java programming techniques. Together, we’ll continue to learn, grow, and create a brighter future in the world of software development!

How to Write a Java Program to Print a Fibonacci Series

What is the Fibonacci Series?

The Fibonacci sequence is a series of numbers in which each number is the sum of the two preceding ones, starting from 0 and 1. The sequence goes 0, 1, 1, 2, 3, 5, 8, 13, 21, 34, and so on.

Leonardo Fibonacci

The Fibonacci sequence is named after the Italian mathematician Leonardo of Pisa, who was known as Fibonacci. It is not just a mathematical sequence, but has several applications in various fields such as nature, art, music, and financial markets.

In mathematics, it is used to illustrate the growth of systems that follow a recursive pattern. In biology, it appears in the arrangement of leaves, branches, and flowers on plants. In finance, it is used to identify potential re-tracement levels in stock prices.

Overall, the Fibonacci sequence provides a simple example of a pattern that occurs in many different areas of science and nature, making it a popular topic in mathematics education and research.

Now lets walk through the code

To note: the Fibonacci sequence is a series of numbers where each number is the sum of the two preceding ones. Once you understand you could just build this algorithm without a walkthrough. But if you want to save your time here is the answer!

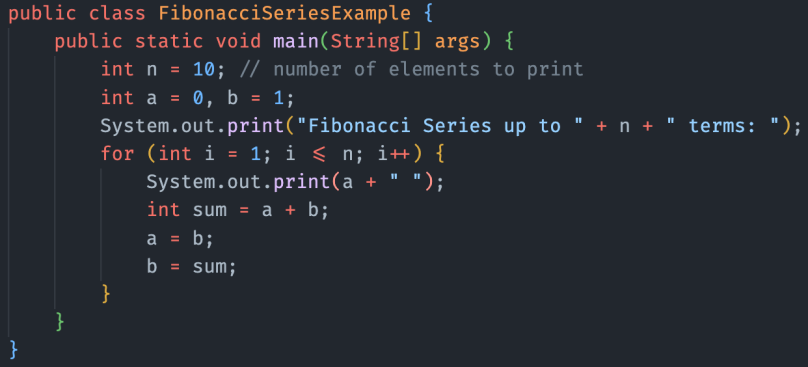
  • To write a Java program to print a Fibonacci series:
    • Initialize the number of elements to print (n)
    • Initialize two variables (a and b) to the first two numbers in the series (0 and 1)
    • Use a loop to print the first n numbers in the series:
      • Print the current value of a
      • Compute the next number in the series by adding a and b
      • Update the values of a and b so that a becomes the previous value of b, and b becomes the current value of the sum
    • Output the series
  • The program could be modified to take input from the user for the number of elements to print, or to use recursion to generate the series

Code example

public class FibonacciSeriesExample {
    public static void main(String[] args) {
        int n = 10; // number of elements to print
        int a = 0, b = 1;
        System.out.print("Fibonacci Series up to " + n + " terms: ");
        for (int i = 1; i <= n; i++) {
            System.out.print(a + " ");
            int sum = a + b;
            a = b;
            b = sum;
        }
    }
}

Final Note

The Fibonacci sequence is a fundamental concept in mathematics and computer science, and is used in many different applications. Understanding how to code the Fibonacci sequence is important for developing problem-solving skills and algorithmic thinking. Coding the Fibonacci sequence is a useful exercise for beginners in programming, as it helps to build understanding of basic programming concepts such as loops, variables, and data types. Knowledge of how to code the Fibonacci sequence can be applied in many other areas of programming, such as developing algorithms for financial modelling, image processing, and cryptography. In addition, the Fibonacci sequence is found in many natural phenomena, such as the spiral patterns of seashells and sunflowers, and understanding its properties can help us better understand the world around us. Finally, being able to code the Fibonacci sequence is a valuable skill for anyone interested in pursuing a career in computer science, mathematics, or related fields, as it is a commonly used example in interviews and programming challenges.

Spring Boot Filters

Spring boot filter

What are Spring Boot filters?

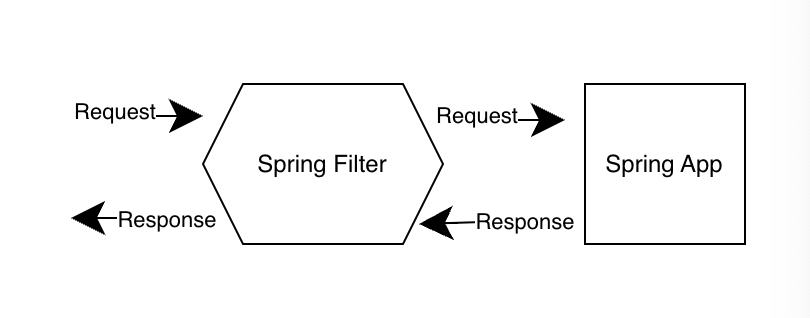
Spring boot uses filters to distill HTTP requests, the process here is:

  • Intercepts the request
  • I.e The client side invoking https requests and responses

What can filters be used for?

A filter is able to perform two operations, this is done on the response and the request. This can be used to restrict URL access to users and other functionality on the request and the response.

When does a filter get invoked?

The filter comes before the controller, this determines if the request can interact with the desired controller and the response it should return.

Lets take a look at the syntax

Firstly, we start with a class that implements the interface Filter with its methods:

@Component
@Order(1)
public class ExampleFilter implements Filter {
  @Override
  public void doFilter(
    ServletRequest request,
    ServletResponse response,
    FilterChain chain
  )
    throws IOException, ServletException {
    HttpServletRequest servletRequest = (HttpServletRequest) request;
    chain.doFilter(request, response);
  }
}

As shown above the syntax has some fundamental syntactical areas that provide configuration to filter on how we apply them, lets go through this:

  1. Filters are uses to incept or filter http response and request instance
  2. Operations can be performed on the request instance (before sending the response instance to the controller)
  3. Operations can be performance on the response instance (before sending the response back to the requested client)
  4. @Component annotation is used in a spring boot application in order to utilise filter class
  5. javax.servlet.Filter is the package used for this
  6. The @Order annotation allows us to order our filter as we can use multiple filter!

Lets take a deeper dive on how this works…

  1. @Component annotation is used alongside Filter implementation in order to initialise the class on startup in spring
  2. @Order(1) annotation is used to execute the filter first in the application
  3. After this, we need a class that implements the Filter interface from Servlet, this interface bring in doFilter() method
  4. So for the example above we have overridden the filter methods inside the class
  5. The doFilter() method will trigger if we receive any request or any HTTP request from the client (This is why we have ServletRequest and ServletResponse objects)
  6. At this point the ServletRequest object is then used casted to the HttpServletRequest object, and this attempt to get the URI from it
  7. This doFilter() method will now hand over the object to the controller, and all the required operations with get performed there 🤗
  8. Once all the operations are done! The control returns back to this doFilter() method again
  9. Loggers could be place here to monitor requests and response details (useful for debugging)

Final Note

Adopting filters are incredibly powerful for when we want to do things before and after receiving or responding to requests! Additionally, we can restrict URL, and there are also some more out the box implementations of filters that adopt security, such as BasicAuthenticationFilter (that can be used to support (OAuth2 implementation) or you can create your own custom filters.

What is Leaderless Replication?

Quickie on multi leader and single leader replication

Typically a single or multi leader replication approach is adopted, this is based on the concept:

  • Client sends write requests to one node the leader
  • The database system takes care of copying data it writes to other replicas
  • A leader determines the order the write should be processed
  • The followers apply the writes in the same order

Although.. some data storage systems can take another approach…

The leaderless replication set up

As the name entails this means abandoning the concept of a leader. So this means:

  • Allowing any replica to accept writes from clients
  • Some of the earliest replicated systems were leaderless
  • The idea was forgotten during the domination of RDBMS…

Don’t lose hope, it has once again became an attractive architecture for databases, for instance:

  • After Amazon used it for its in house Dynamo system adoption has grown
  • Riak, Voldemort, Cassandra are open source data stores with leaderless replication models, inspired by Dynamo
  • This kind of database is called Dynamo style

In some leaderless replication styles the client sends it writes several replicas:

  • While with others, the co-ordinator node does this on behalf of the client…
  • However unlike a leader database that co-ordinator does not enforce a particular ordering of writes

As we shall learn in the next blog post this difference in design has profound consequences for the way the database is used.

How to Resolve Conflicts with Custom Conflict Resolution?

In some scenarios, the most suitable way to resolve a conflict resolution may be dependent on the type of application being built.

👉 Most multi-leader replication tools allow you write custom conflict resolution logic using application code.

  • This could be on executed on a write or a read ✍️ đź“–
    • On write ✍️
      • As soon as the database detects a conflict in the log of replicated changes it will call a conflict handler
      • For example, Bucardo allows you to write snippets of Perl for this purpose
        • This handler typically cannot prompt a user
        • It runs as a background process and it must execute quickly
    • On read đź“–
      • When a conflict is detected all the conflicting writes are stored
      • The next time data is read, these multiple versions of the data are returned to the application
      • The application may prompt the user or automatically resolve the conflict and write the result back to the database
      • For example: CouchDB works this way!

✋ To note, that conflict resolution is only applied on the individual row or document not for an entire transaction…

🤔 Meaning, if you have a transaction that makes several different writes, each write will need to be handled separately for the purpose of conflict resolution.

To be continued…

The final post will be covering the powerful capability of automatic conflict resolution and reasons why you may consider this approach, as writing custom conflict handlers can be error prone!

For more reading on conflict resolution:

The Five Design Principles: SOLID

To start, in object-oriented programming, there is a helpful acronym used within software development named SOLID. Whereby, this was created to define five simple design principles. The goals of the principles, are to achieve more understandable, maintainable and extendable software where designs are understandable.

In addition, to give credit the origin of this acronym was from the famous software engineer and instructor Robert C. Martin, whom has written multitude of best-selling software design and methodology books within the field of software engineering.

What does SOLID stand for?

  • Single Responsibility Principle
    • Class should only have one reason to change
  • Open-closed Principle
    • Open for extension, closed for modification
  • Liskov Substitution Principle
    • Design by contract
  • Interface Segregation Principle
    • Many client specifics interfaces are better that one general purpose interface
  • Dependency Inversion Principle
    • Depend upon abstraction, not concretions

[S] Single Responsibility Principle

“A class should have only one reason to change”

Martin Fowler
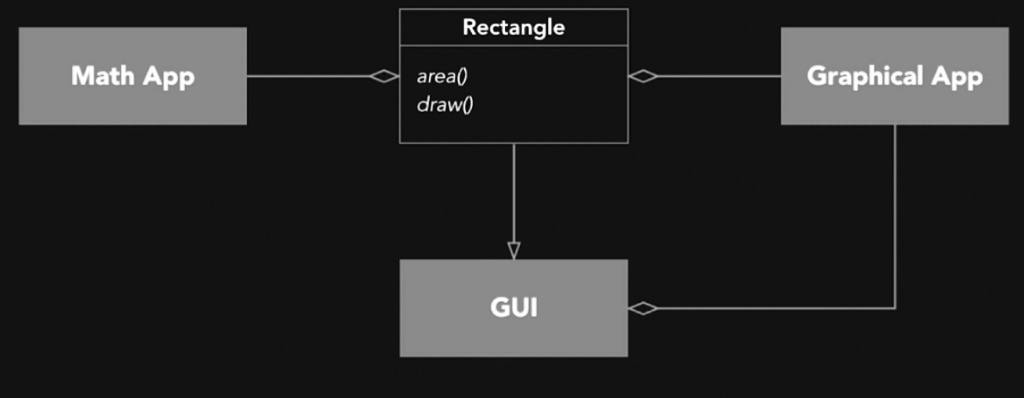
❌ Consider a Rectangle Class…

There are problems with this design…

  • Rectangle class is immobile
  • You are forced to use its additional dependencies when you may just want one thing!

🤔 Consider this design

Now to question…

  • Do these methods make sense together?

âś… Solution

Two Interfaces…

⚠️ Do we need to do this all the time?

  • Will parts of your class change when others do not?
    • âś… If yes – This type of solution is recommend!
    • ❌ If no – This solution may not be required
      • Beware of adding unwanted complexity

[O] Open-closed Principle

Closed for modification and open to extension.

❌ Bad example

We keep editing the method for new changes.

âś… Good Example

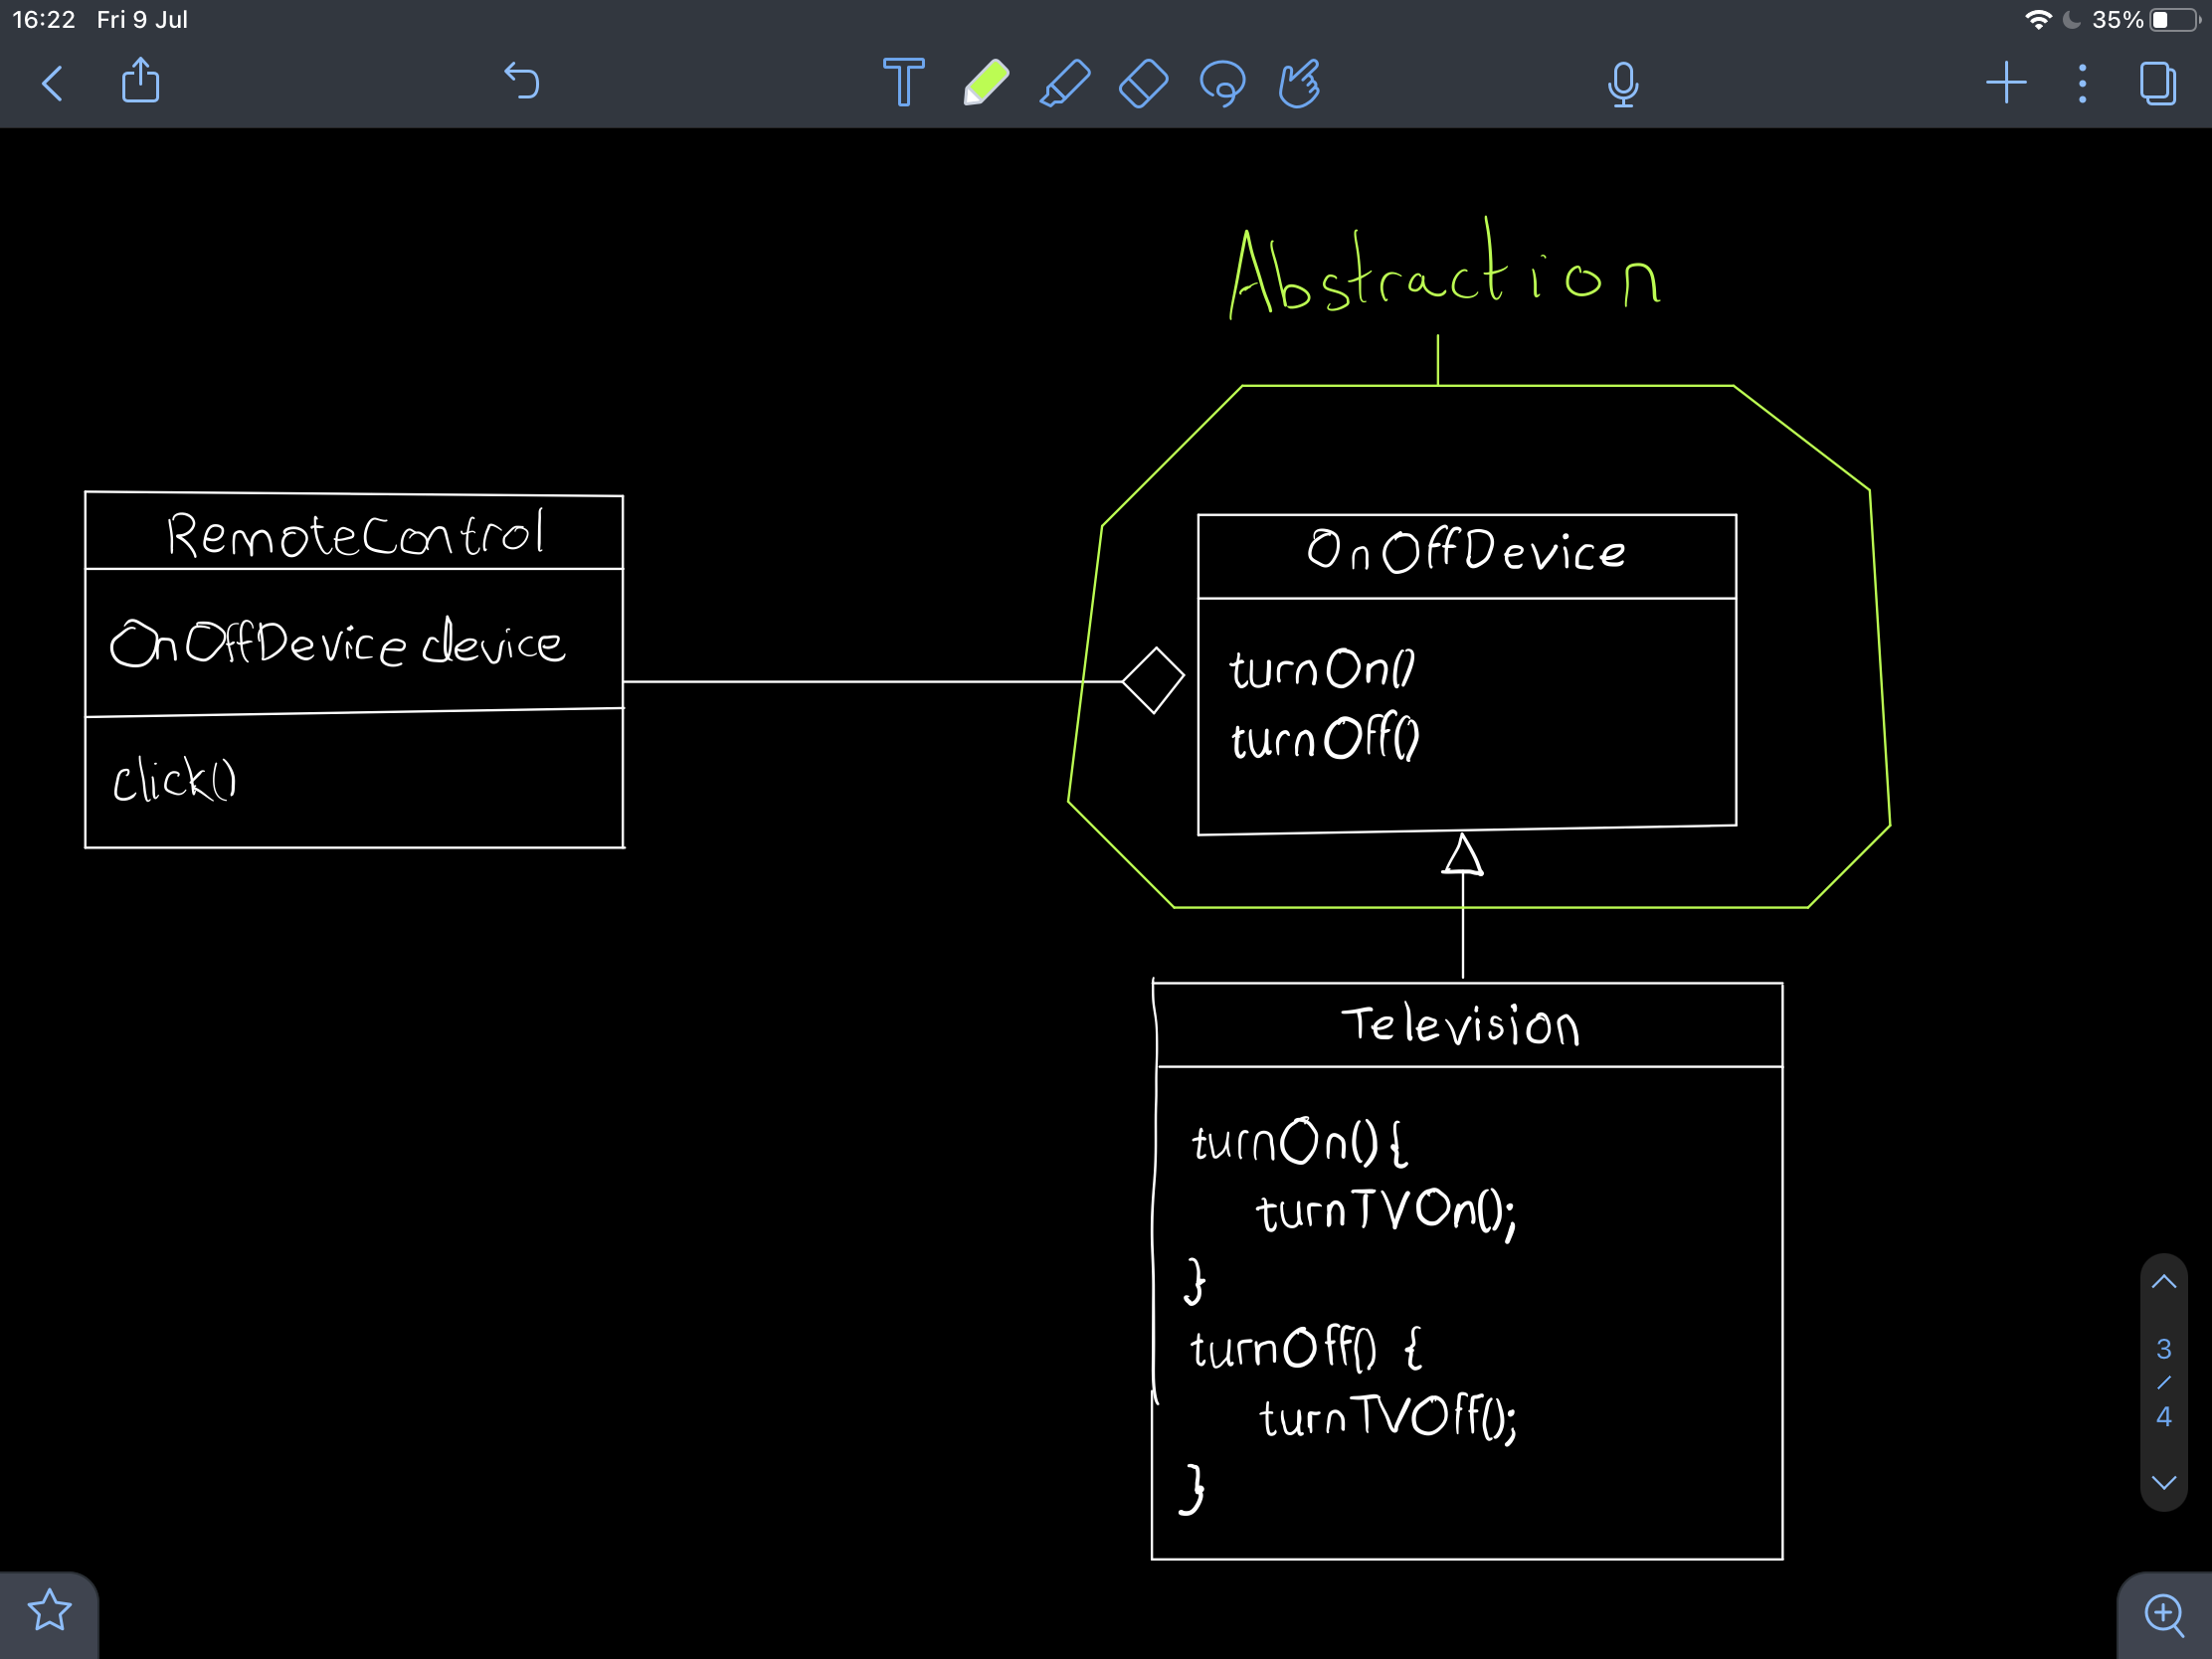
🟡 Bonus principle: Illustration above shows the inheritance principle of favouring composition over inheritance.

To note, with this design it should be quite easy to add different TV providers.

[L] Liskov Substitution Principle

You should always be able to substitute subtypes for their base classes.

This can be seen as ensuring a class is behaving as it is intended.

How not to violate this principle?

Design by contract

This technique ensures that the classes design is not breached by determining these key checks:

  • Pre-conditions
  • Post-conditions
  • Variants

Why is this useful?

Testing

These particular contractual conditions will help develop code that is easier to test, therefore creating more robust solutions.

[I] Interface Segregation Principle

Cohesion

How strong are the relationships between an interface’s methods?

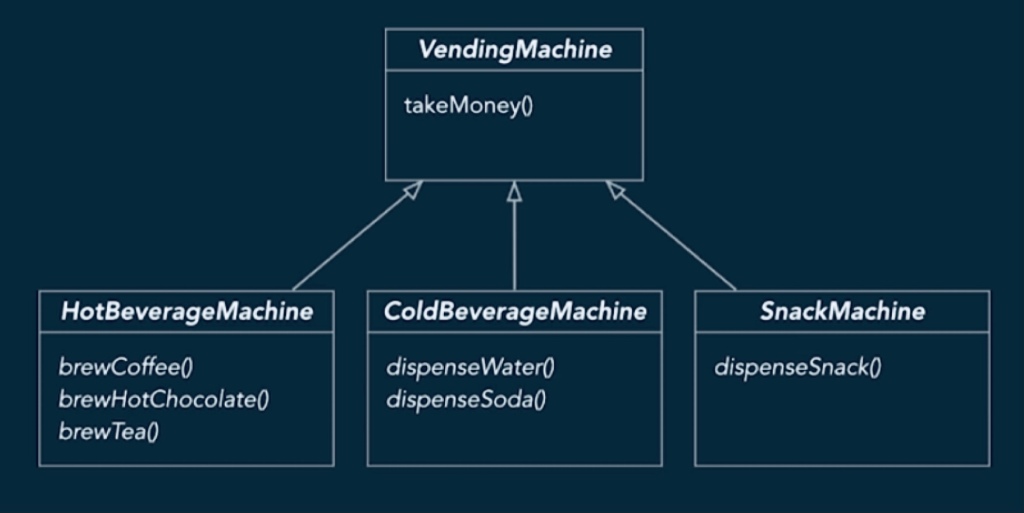
❌ Example of low cohesion

Methods are not that similar and serve different purposes.

âś… Example of high cohesion

Methods are related there respective classes.

Maybe we need a machine that requires everything!

[D] Dependency Inversion Principle

High-level modules should not depend on low-level modules.

❌ Bad Example

Low level components are tied to high level components:

âś… Good Example

Both high level and low level should depend on abstraction: